Here we go with part 2 of my Eventide Anthology XI review! In part 1 we went through some really great plugins, and a couple that were kinda, I dunno, questionable as to why one would bother using them. That’s the thing about plugin bundles, not everything you get is something you’re gonna use. Sometimes there’s overlap. Like, you get multiple variations on a single theme. Which we’ll be seeing a lot of in these next two parts of the review. Starting with….
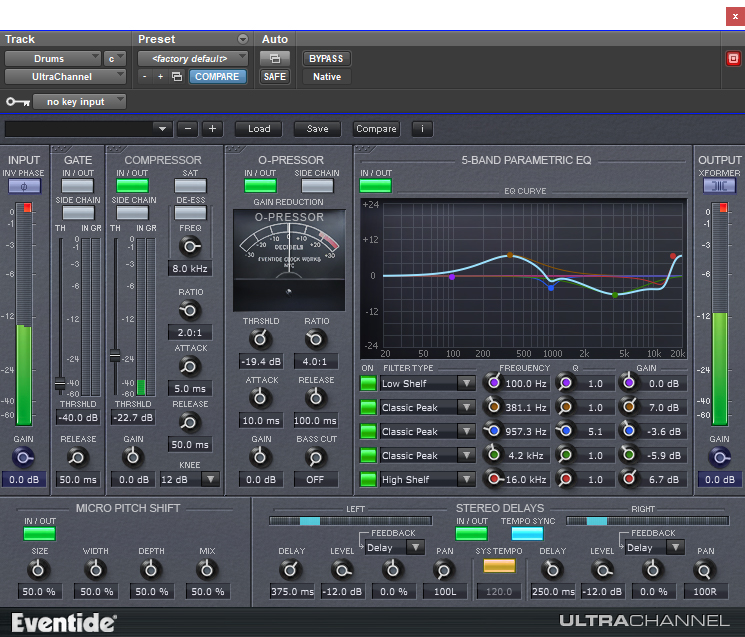
This is a review that I could easily do a copy/paste of from my previous Anthology review. The difference being that this is more the deluxe version. In addition to the EQ, Gate, and Comperssor, we have a second compressor (the compressor part of Eventide’s Omnipressor) a pitch shift section based on Eventide’s Harmonizer micro-pitch shifter, and a stereo delay. So, I’ve got the basics of the That Which Shall Not Be Named channel strip, plus a high end outboard compressor and some creative effects to add additional fun to what I’m doing. What do these extra features add that makes this plugin worth grabbing over the regular EChannel? Well, the O-Pressor is far more aggressive sounding than the standard compressor, so if you’re after a different flavor of compression, or want to do something in serial, then this is good for you (Full review of the Omnipressor coming eventually, since it’s also in this bundle).
The delay is a delay. Nothing particularly interesting about it, other than the feedback feature. Which is awesome. Normally a delay would feedback into itself, but with this you’re able to send the feedback signal to any other part of the channel strip. Per the manual’s recommendation, I’m sending the feedback to the gate (on the drum bus), which is set pretty aggressively to only let the transients through. It’s creating this stuttering effect, with some width being added by the delay. Once the cymbals kick in, the gate stays open (and is helped to be kept open by the delayed signal) and we get this washy rhythmic delay effect, but only at the parts when things are really kicking. Or we can have the delay trigger a compressor, helping us keep the levels of the delayed signal from building the overall levels of the signal.
The other unique feature of this channel strip is the micro pitch shift section. The manual says that this feature is unique to this particular channel strip, and looking at the Harmonizers also part of this bundle, I’d say, at least control wise that it is. I’m not well versed in the applications of micro pitch shifting, so I’m going to talk more about sound and let you decide how to apply it to your own work. We don’t get any numbers telling us exactly what we’re doing, so we work entirely by ear here. Good, but also not good, if you’re used to having set values that you like to use. Size represents the amount of pitch shift that happens; Width the perceived wideness; Depth the spread over time; and Mix is, well, your mix blend. I’m noticing that I like Mix at 100%, as utilizing a blend does create a delay effect. The rest of the controls are easy to use, but not exactly easy to dial in. What I mean by that the results are subjective enough that, unless you have a specific sound already in your head, you can easily get lost in the different permutations. Since this is part of a channel strip, I’m guessing you want to be able to do something subtle. By gently tucking some extreme width into my dry signal I was able to add width and some interesting tonality while avoiding that obnoxious delay I was having earlier (by keeping Depth low).
Overall a very good channel strip, and I like the additions. That O-Pressor is pretty aggressive (full review eventually), but I can see it working in certain situations, and the micro pitch and delay sections add a lot of creative possibilities. So yay!
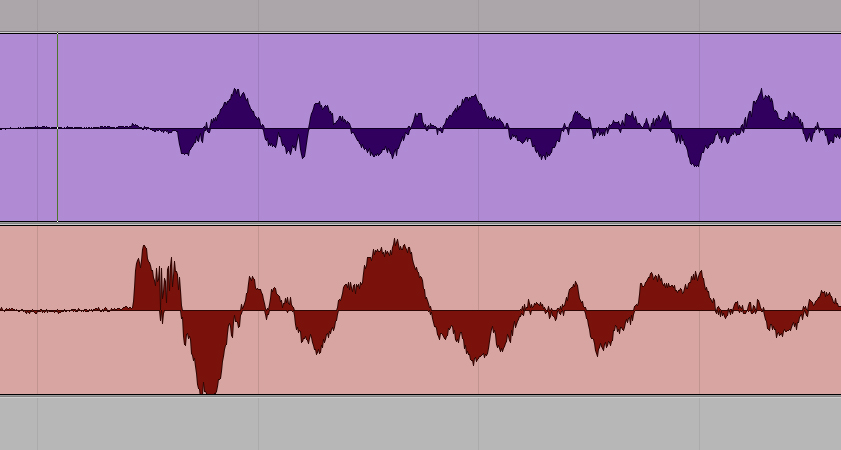
Now this is the plugin for me! If you didn’t know already, I like drums. Like, a lot. Like, a lot a lot. But as fastidious as I am when I set up microphones, sometimes things just don’t work out. Maybe the drummer taps the overhead stand, maybe the assistants aren’t as careful as you’d like them to be, maybe the mic stand droops ever so slightly. Whatever the case may be, you’re in the mix, ready to go, and quelle horreur, your mics aren’t perfectly in phase with each other! You zoom in and see this:
What’s a girl to do? Well, you could manually adjust things and risk screwing up your edits, or you could reach for a sample delay tool. Pro Tools comes with a stock one, but that only lets you delay, and has a minimum of four samples. What if you need to adjust it by three samples, Pro Tools? And what if you want to adjust by more than just samples?
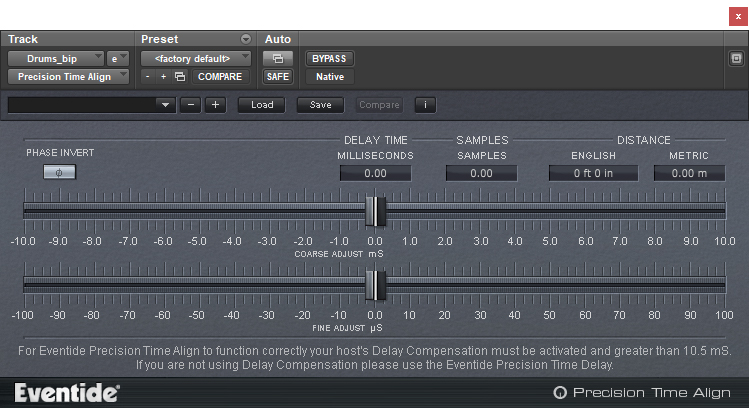
Precision Time Align/Delay is a suped up version of a sample align plugin. The two are virtually identical, save for Align being able to move things earlier in the timeline whereas Delay only allows you to move later. In order to accomplish this, you need delay compensation, and the plugin adds its own latency, so best to stick with the Delay version if you’re still tracking. The controls themselves are very fine tunable, allowing you to go coarse, by the millisecond, or fine, by fractions of a sample. Not even nudging can go that fine! What I like, though, is being able to easily put in the various values depending on how I want to adjust things. In the above example, I’d measure the difference in signal by the sample and apply a delay (or reverse delay) to one of the two to get them in line. With the plugin I can easily type that in and get it adjusted, as well as get a sense for the difference in distance. That’s super useful, if I’m using the plugin to fine tune my setup and am wondering how much further or closer my second room mic needs to be in order to be in phase. It’s very utilitarian, but I like it, especially that distance feature, and if I really really wanted to be 100% in line phase wise, then fractions of a sample are great!
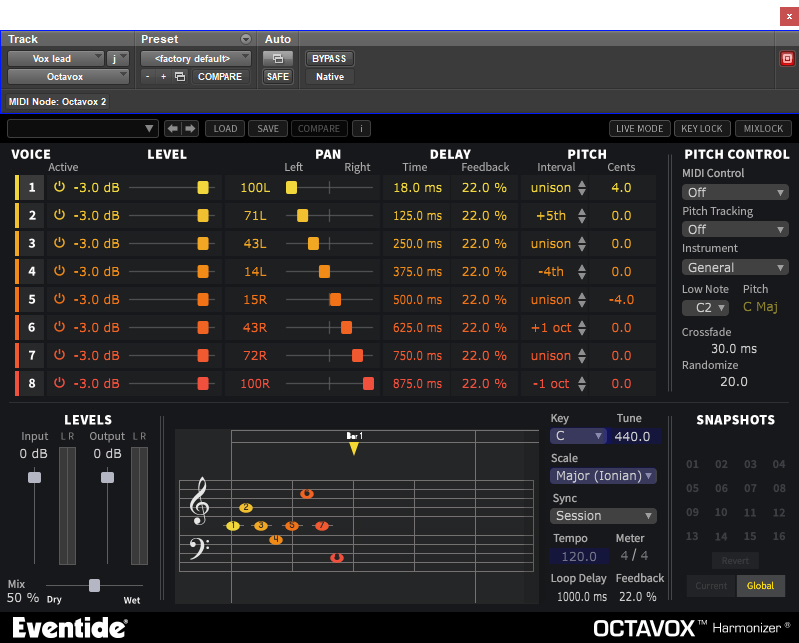
So this is a fun, crazy, ridiculous plugin that I’ve barely scratched the surface of its applications, because, like a lot of Eventide plugins, their use is not quite genre specific but definitely niche. This default setup, like you see here, is a completely insane way to introduce a plugin. You have eight total voices of varying pitch, panning, and delay values, creating this cascading effect from left to right of low and chirpy and all sorts of in between harmonies that is cacophonous and, while I guess it demonstrates what is possible with the plugin, it’s completely unworkable. This is a demerit off the bat, since I want the default state of a plugin to be either a blank slate, or something in line with the most common use of the plugin. This feels like we’re given the AES conference demo instead of something workable. The first thing we have to do is turn off and reset everything, which takes time, so boo to that. Or we hop into the preset menu and find something that works for us, which is slightly less obnoxious. The presets themselves are actually quite good, ranging from your basic harmony creators to some rather intense rhythmic and harmonic options that have applications from boundary pushing music to creating the voice of the big gruff aliens in the next big budget sci-fi blockbuster. Thankfully, for all its intimidating initialization woes, the actual sound of the plugin is superb. I don’t hear any of the artifacts that come with pitch shifting from even the better pitch shifting plugins out there, making it almost sound natural, or as natural as chipmunk voices can be.
Using the plugin is relatively simple. You select your voices, their intervals, panning, and any delay or feeback you want to add to it. Neatly, you’re able to choose your key and scale type, so you can drag your various voices around the musical scale. Giving you additional control (and easier control) in fine tuning your harmonies. You also have control over how the plugin works with midi input, allowing you to use it as an arpeggiator, adjusting the intervals based on the note played. That’s a level of complexity that goes beyond how I used it in a mix. I was confronted with a solo that sounded decidedly 90s, and the effect I wanted was an ocatver. I had one, but it didn’t sound good. I tried other plugins, but they also didn’t sound good. I gave this one a go and it sounded too good. I ended up going with this, because I’d rather have too good than not good enough, and out of everything it’s the only one that actually sounded like a proper octave. Go figure.
This is a good plugin, and its utility and creativity goes way beyond how I’ve used it. With applications in music, post, performance, and the ability to have everything from subtle harmonies to absolutely cacophonous insanity, it is an incredibly versatile creative effect. The difference between the Octavox and Quadravox is the number of voices you get, and if you buy the Anthology you get both, so yay! This is a good plugin to have. You may not use it all the time, but when you do it’s exactly what you need.
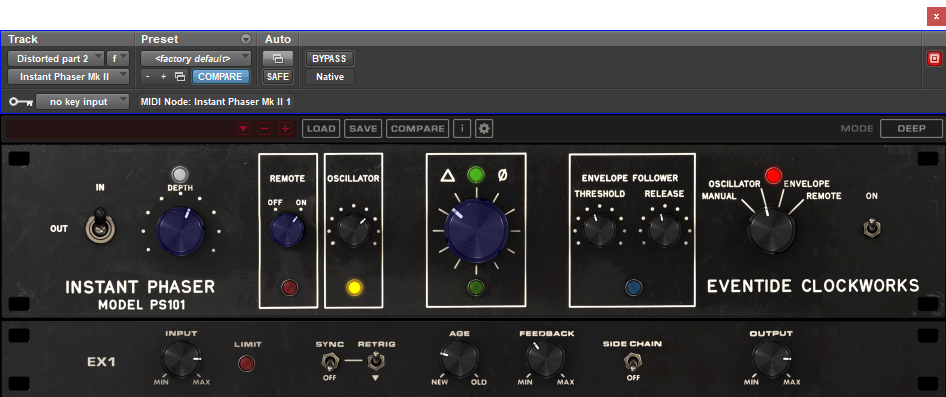
I have a lot of phasers. I don’t know where they all come from! I don’t seek them out, I don’t even use them (jeez Lilian, do you actually use anything?) they just appear in my plugin list. When I do reach for a phaser (usually right before I decide to use something other than a phaser), I tend to go for something simple. After all, I don’t want to be messing around with a bunch of settings if I’m not sure whether or not what I’m doing is the right thing to be doing in the first place (it never is). I like Avid’s Orange Phaser. It’s got one knob. If that doesn’t work, then nothing will. So, imagine my dismay opening up Instant Phaser and seeing all these controls! I don’t think a single other phaser that I have has so many options! Maybe Melda’s phaser (their stuff is super complicated). Lucky for me, I had the perfect source to try this on. Specifically, the guitar solo I used the Octavox on. It’s so 90s, I feel I can use any effect and it’ll sound 90s. I went with the Octavox because that was what was in my brain, and didn’t bother trying any other effects (it helped that there was already a double that was an octave up, so I was augmenting the effect that was already present).
The Instant Phaser is based on a very old piece of analog equipment meant to replace manually tape flanging. Instead of delays, though, the unit used “electronic phase shift networks” (coming from the manual) which allowed you to “sweep the nulls produced in the frequency spectrum in a manner similar to the effect of varying a time delay.” (I should just copy the copy.) Which is not quite flanging. But it is something that sounds cool!
From the get go I’m impressed by the sound. I don’t hear any of the artifacts or weird coloration that I get from other phasers. The Instant Phaser sounds like a phaser. The controls themselves are a bit intimidating, but you can easily get the sound you’re after with the depth (only phase shifted to both dry and phase shifted signal) knob and the oscillator. You get the swooshing and the sweeping and yes, phaser. Exactly like what you’d get from a guitar pedal. But that’s not all! You have three other sources to choose from in order to customize your phasing effect. You’re able to manually control the phase null, allowing you to automate it’s position and speed or what have you. You can set it so that it reacts to the envelope of the incoming signal. You’re even able to control it with a midi controller. The bottom panel allows you to sync the oscillator to the bpm, have the oscillator reset itself so that the phaser is the same for each playback (which is super cool), adjust the overall grit and grime of the plugin (modeling everything from a new unit to one that’s lived in a smoky studio for forty years whose “Warranty void if broken” sticker is still intact), a feedback knob, and a sidechain which allows a different source to control the envelope detection mode. The level of creativity that you can get out of this unit is astounding. Just typing this my mind is going to the possibilities of what I can do, knowing full well that I’m not adjusting the plugin so it sounds good, but so I get it to sound like what’s in my head. Or something that I could never even dream of. A properly set envelope sounds so cool. Or I can automate either the envelope or the manual control and play along with my source to create a dynamic effect. Or the age parameter. Yay automation! Now, will this plugin get me to use phasers? I dunno. Probably not. Mostly because the stuff I work on doesn’t really need phasers (or it’s coming to me through a guitar pedal). But, if I do need a phaser, this is the phaser I’m reaching for.
Now we move on to the flanger. If the phaser was about getting close enough to tape flanging, this is meant to get us all the way there. Flanging is a creative effect that goes wwwoooossssshhhhhhssssshhhoooowww. It is created by playing two copies of a signal at once, with one copy slowed down very very slightly (roughly 1-15ms). Initially this was accomplished with two tape machines and someone lightly pressing on the flange, hence the name: tape pusher downer sound thingy. Or “flanging” for short. This tiny delay creates a series of nulls that are harmonically related to each other, and by varying the delay time you get that characteristic woosh sound.
Shockingly, I only have five flanger plugins. How am I to live? My go to for this is actually Mod Delay. Because the modulation section is what you use if you want to create flanging (or chorusing, or doubling). Melda Production’s flanger is good too (they have a bunch of great free plugins). Like phasing, this is not an effect I use often, but when I need it I want it to be good. So is Instant Flanger good?
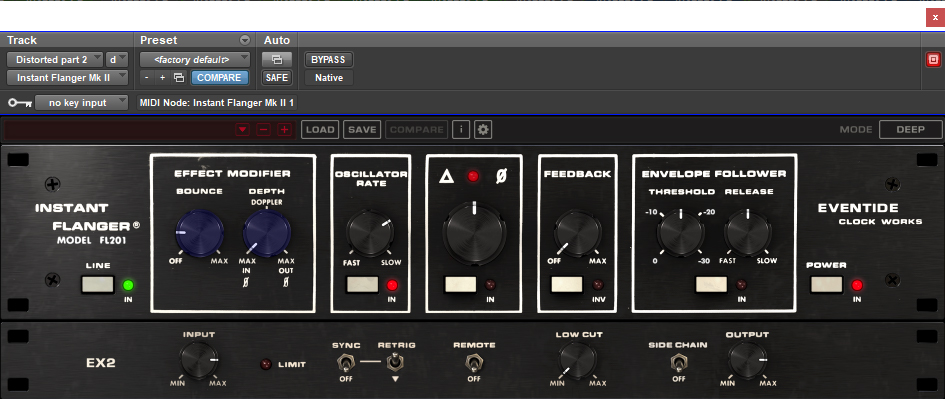
Loading it up to the default I’m not particularly overwhelmed. Unlike Instant Phaser, the effect is much more subtle than what I’m after. Gimme the free MFlanger or Avid’s flanger pedal emulation and I’ll have that classic sound instantaneously. Instant Flanger makes you work for it. Even loading up the presets gives me something that sounds like what I want, but without the exaggeration that really cuts through a mix. Not that it doesn’t sound good. It’s just that I’m struggling to get it to sound like what flanging sounds like in my head. Maybe it’s the complexity of the controls, maybe it’s just the sound of the box it’s based on, but what you’re getting is a sound that’s wholly different from what you’re expecting.
Control wise you’ve got your depth control, which goes from only delayed signal, to both delayed and dry signal, to dry and an inverted delay, giving you all sorts of different combinations of sounds. 0% is closest to the classic flanging sound that I’ve after. Bounce emulates the, um, bounce of the tape servos, giving you an extra sound that brings you closer to actual tape flanging. Your rate can be controlled by an oscillator, manually, or with the signal’s envelope, opening up lots of creative possibilities (that envelope control is particularly intriguing). You also have the retriggering control found on Instant Phaser, so the effect starts at the same part in the cycle every time you play. Noticeably lacking is the Age control, which makes me sad. I want to emulate grit and grime with this one. Maybe that’ll give me some extra fun because right now it’s too pristine, even for its effect. I like the plugin, but to me it’s not a flanger. Or, at least, not the kind of flanger I want. I may find some use for it, but it’s not going to be my first grab, like Instant Phaser. Or my second. Or it’s just too complicated to get the woosh I’m after for me to figure it out, which is also a problem.
And that’s it for part two! I’ll get around to part three eventually.

Lilian Blair is a producer, engineer, and audio educator in the Seattle area. She specializes in studio recording, mixing, and helping artist achieve their musical dreams.
www.lilianblair.com


